How to Build a Discord Bot in Node.js
Introduction⌗
This blog post will describe, in proper detail, how to make a Discord Bot.
What is a Discord Bot?⌗
A Discord Bot is an automated program which can be accessed via messages on the Discord platform. They can be thought of as special accounts within the platform that are controlled via code, not humans, and their functions and features are at the discretion of the developer.
What will be taught?⌗
Over the course of this blog post, you will learn about how to configure settings on Discord and how to set up Node.js and VSCode in order to write code and run a Discord bot. This post does NOT cover the permanent deployment of a discord bot (on a remote server), how to code in JavaScript (although there will be explanations of the code written), best security practices, or how to further extend functionality. You will still get a working discord bot that runs, and is testable (while you have your program running).
What are the prerequisites?⌗
You are expected to:
- Have a working computer with an Operating System (Windows, MacOS, or Linux) equipped with the necessary permissions to install software.
- Have a Discord Account already made and logged into in their preferred Web Browser.
- Have an beginner’s understanding of various NodeJS, NPM, VSCode, and Discord terms.
- Have a mind that is excited to learn.
- Take advantage of the giscus comment section under this blog post to ask questions.
This guide is Operating System Agnostic, and all steps should work regardless of your platform. However, commands will be provided for those on MacOS with the homebrew package manager installed.
Instructions⌗
1. Install Node.js and Visual Studio Code (VSCode)⌗
- Navigate to https://nodejs.org/en/download in your Web Browser.
- Follow the prompts and the instructions to install the latest LTS (Long-Term-Support) version of Node.js on your operating system(24.13.0 at the time of writing).
- Navigate to https://code.visualstudio.com/download in your Web Browser.
- Click the button to install the latest stable version of VSCode based on your Operating System and preferences.
- For MacOS users with homebrew installed:
brew install node # Install node.js
brew install --cask visual-studio-code # Install VSCode
2. Create a New Folder and Open it in VSCode⌗
- Create a new folder in your operating system file explorer or command line interface (CLI).
- Open the folder in VSCode. Here are two possible methods of opening the folder.
- Open VSCode, click on
Filein the Application Bar, and selectOpen Folder, subsequently choosing the folder you just created. - Right click the folder that was just created and click
Open in VSCode(most applicable in Windows environments).
- Open VSCode, click on
3. Create a JavaScript file and Install Required Dependencies⌗
- In the left
Explorermenu of VSCode, right click and pressNew file.... Type in the file nameindex.js. - Press control and backtick in order to open up the CLI in VSCode.
You could also navigate to Application Bar and navigate to
Terminal, and then clickNew Terminal. - Run the command
npm install discord.js.
4. Configure Discord Developer Settings and Retrieve your Discord Bot Token⌗
Navigate to https://discord.com/developers/applications in your Web Browser. If prompted to sign in, do so.
Click the
New Applicationbutton, type in a name, accept Discord’s policies, and then finally, clickCreate.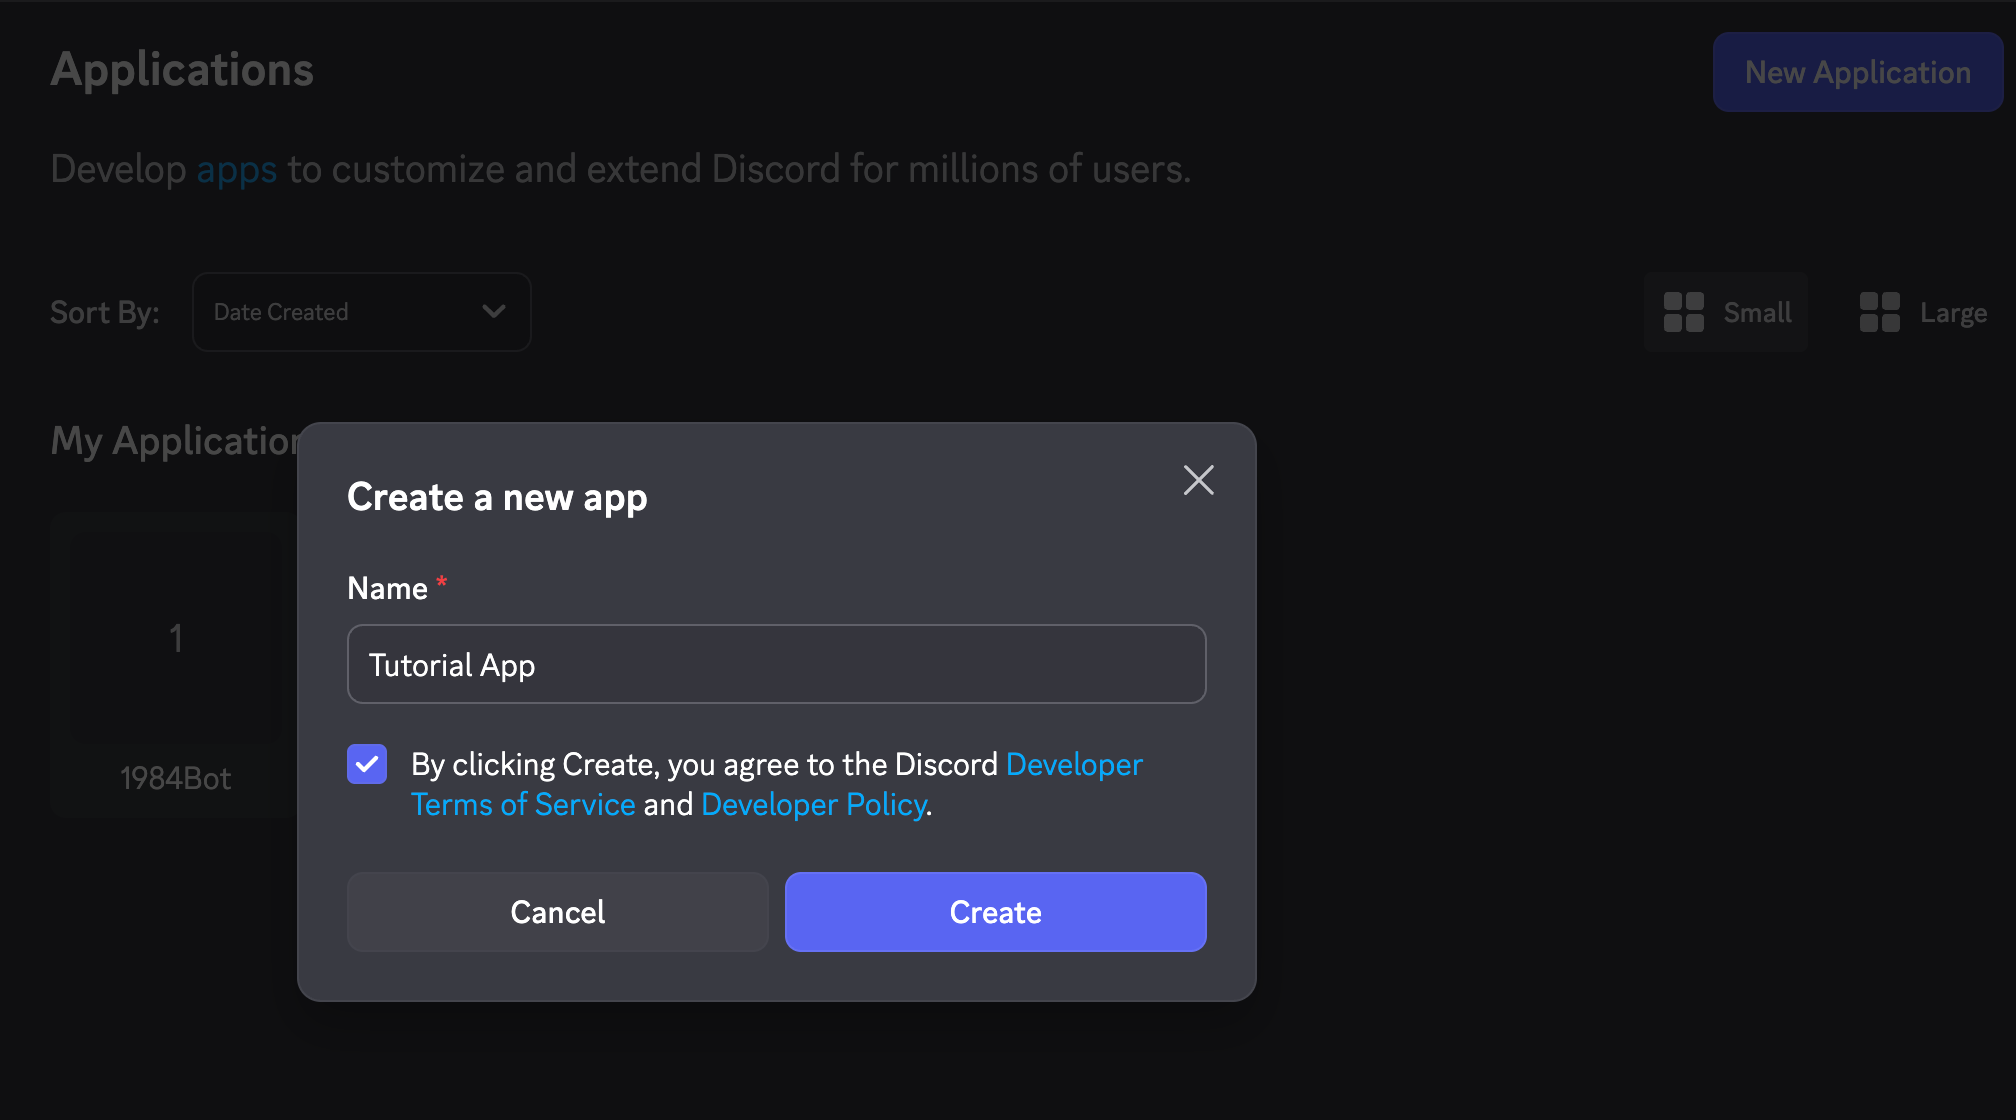
On the left bar, click on
Bot. You may configure various options for the Bot user, but they will be at your discretion.Click on
Reset Token.After verifying your identity, press
Copyin the resulting menu.This will copy your
TOKENstring. A token is essentially a password which grants a bot access to its account. KEEP THIS TOKEN SAFE AND SECURE. Once copied, be sure to not share the token with unauthorized persons so as to prevent unauthorized usage of your specific botNavigate back to the recently created
index.jsfile. Copy the following code into the top of the file:const TOKEN = `<Insert Your Copied Token Here>`;WARNING: This is an extremely bad security practice. For the purposes of this tutorial, having your token in plain text in the
index.jsfile is alright. For future reference, consider researching.envfiles.Navigate back to the Discord Developer Portal, and click on
General Informationand copy the Application ID. Add the following code to the index.js file.const CLIENT_ID = `<Insert Your Copied Application ID Here>`;
5. Get the Bot Invite Link and Invite it to Your Server⌗
Navigating back to the Discord Developer Dashboard, click on the OAuth2 sidebar button.
Scroll down to the
Scopessubsection underOAuth2 URL Generator, and select theapplications.commandsas well as thebotoptions.Scroll down to Generated URL and click on the copy button on the far right of the generated URL.
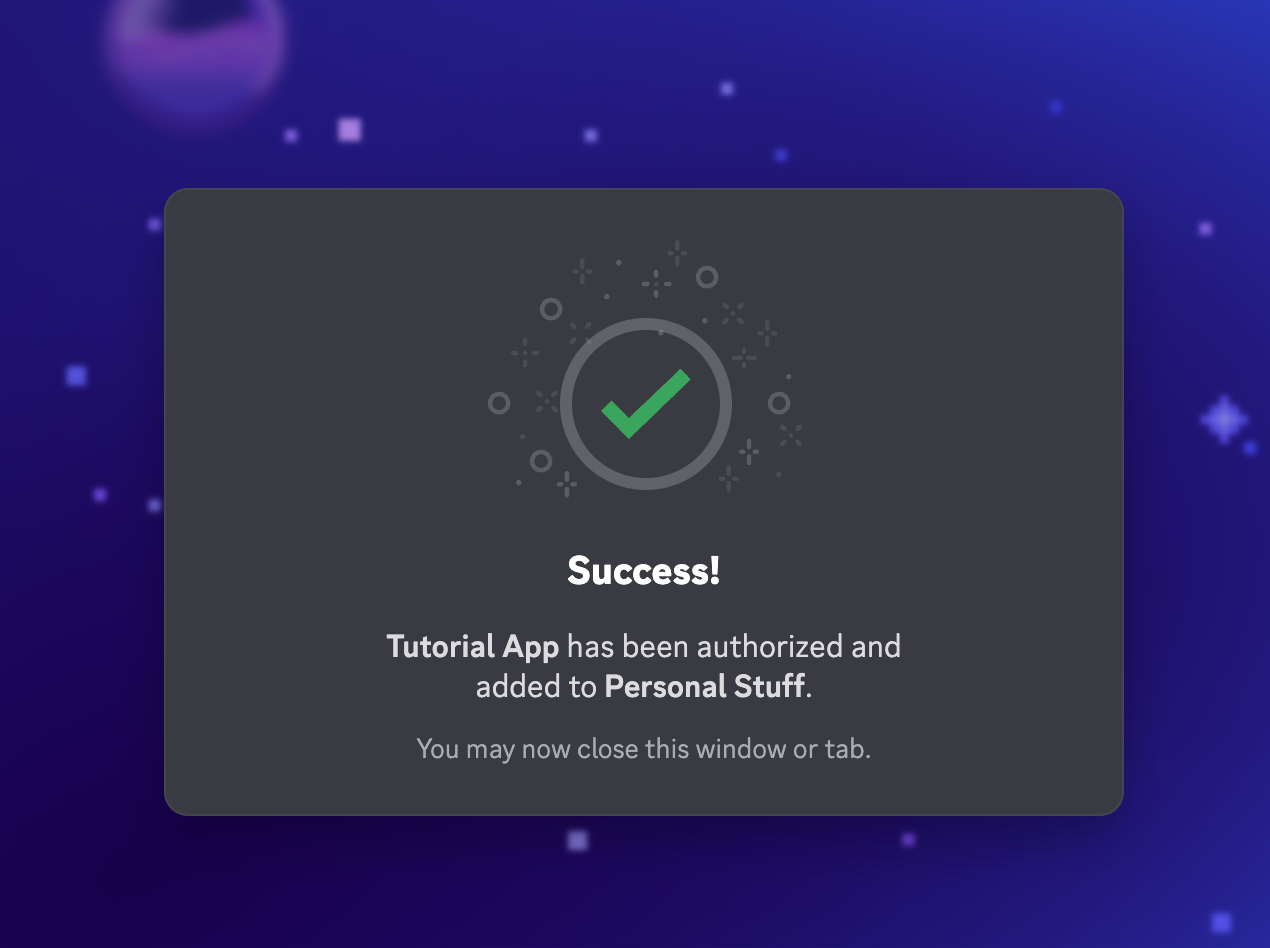
Navigate to that URL, and follow Discord’s modals to add your Bot to a Server of your choosing.
As specified in the modals, You are required to have special permissions in order to add Bots to Servers. If you don’t have the proper permissions, follow Discord’s guide on how to create a Server, and use this “Dummy” Server in order to add and test your Discord Bot.
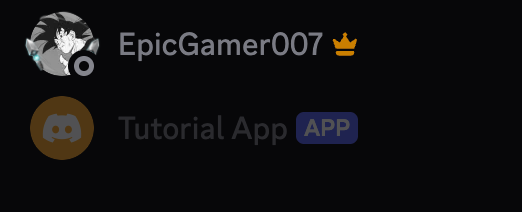
Ensure the bot has succesfully joined the server, observing the bot in the members list on the right side of the Server the bot was added to.
Copy the Server ID, and then add the following code:
const SERVER_ID = `<Insert Your Copied Server ID Here>`;- To copy the server ID, you must first Enable Developer Mode and then right click on the server name where you added the bot, and then click
Copy Server ID.
- To copy the server ID, you must first Enable Developer Mode and then right click on the server name where you added the bot, and then click
6. Write Code and Run the Discord Bot⌗
- Navigate back to VSCode.
- In your
index.jsfile, below the previously added lines regarding the bot token, client ID, and guild ID, add the following code. This code adds all the functionality to the Discord Bot, while registering it with the Server you added the bot to.
const { REST, Routes, Client, Collection, Events, GatewayIntentBits, SlashCommandBuilder } = require('discord.js');

const client = new Client({ intents: [GatewayIntentBits.Guilds] });

const ping = {
	data: new SlashCommandBuilder().setName('ping').setDescription('Replies with Pong!'),
	async execute(interaction) {
		await interaction.reply('Pong!');
	},
};

client.commands = new Collection();
client.commands.set(ping.data.name, ping);

const rest = new REST().setToken(TOKEN);
// and deploy your commands!
(async () => {
	try {
		console.log(`Started refreshing ${client.commands.length} application (/) commands.`);
		// The put method is used to fully refresh all commands in the guild with the current set
		const data = await rest.put(Routes.applicationGuildCommands(CLIENT_ID, GUILD_ID), { body: [ ping.data.toJSON() ] });
		console.log(`Successfully reloaded ${data.length} application (/) commands.`);
	} catch (error) {
		// And of course, make sure you catch and log any errors!
		console.error(error);
	}
})();


client.on(Events.InteractionCreate, async (interaction) => {
	if (!interaction.isChatInputCommand()) return;
	const command = interaction.client.commands.get(interaction.commandName);
	if (!command) {
		console.error(`No command matching ${interaction.commandName} was found.`);
		return;
	}
	try {
		await command.execute(interaction);
	} catch (error) {
		console.error(error);
		if (interaction.replied || interaction.deferred) {
			await interaction.followUp({
				content: 'There was an error while executing this command!',
				flags: MessageFlags.Ephemeral,
			});
		} else {
			await interaction.reply({
				content: 'There was an error while executing this command!',
				flags: MessageFlags.Ephemeral,
			});
		}
	}
});

client.once(Events.ClientReady, (readyClient) => {
	console.log(`Ready! Logged in as ${readyClient.user.tag}`);
});

client.login(TOKEN);
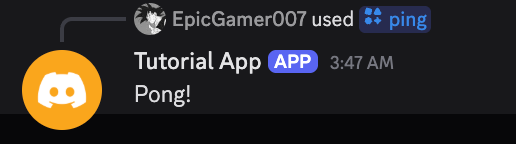
7. Test the Discord Bot⌗
- Navigate to the CLI present in VSCode and run the command
node index.js. You should see something like such:
Started refreshing undefined application (/) commands.
Successfully reloaded 1 application (/) commands.
Ready! Logged in as Your App Name#1111
Navigate to the Discord Server where the bot was added, and then navigate to the public channel the bot has access to.
Type
/in Discord. You should be able to click on your bot’s icon and see the ping command registered and usable. Finish typingpingand click on the ping for the bot you just made.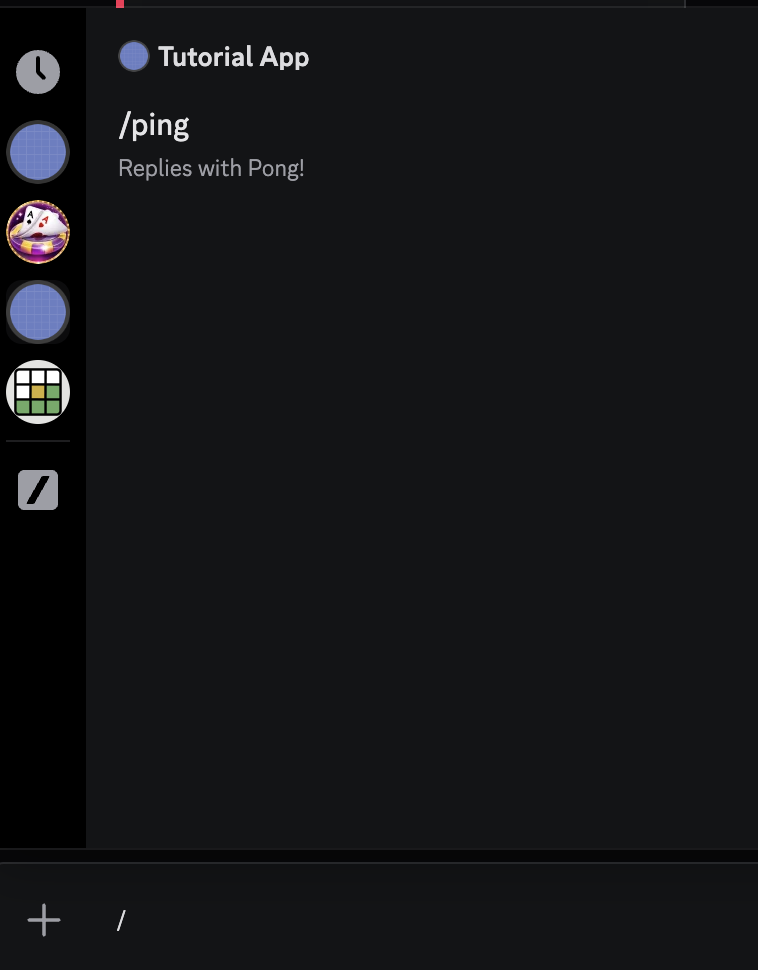
Press enter and see the result!
Conclusion⌗
This blog post guided you through creating a very simple Discord bot. With further research, idea generation, and more, you can further expand utility and write bots better suited for your needs, improving your quality of life on the Discord platform. There are countless ways this simple application can be improved upon, and with time and effort, you can take advantage of this platform to make your impact.